In my previous post, I introduced how to import data into SQL. That process was done manually to import data into a local SQL server. I use MySQL.
A local SQL server means you can only access the data from your own computer. If you use another computer elsewhere, you won’t be able to access that SQL data. However, I want to access my data universally—from any device, at any location—to manage it more efficiently. To achieve this, we can use a cloud-based SQL server, which allows access to SQL data from any computer.
There are many cloud service platforms, such as Google Cloud, Microsoft Azure, and Amazon AWS. However, they can be expensive. Their costs aren’t fixed monthly fees; instead, they depend on how much data you use. I still don’t fully understand how those costs are determined, and I prefer a fixed monthly cost. I found such a platform—DigitalOcean. I’ve tried several cloud services, and so far, I’m satisfied with DigitalOcean.

https://cloud.digitalocean.com
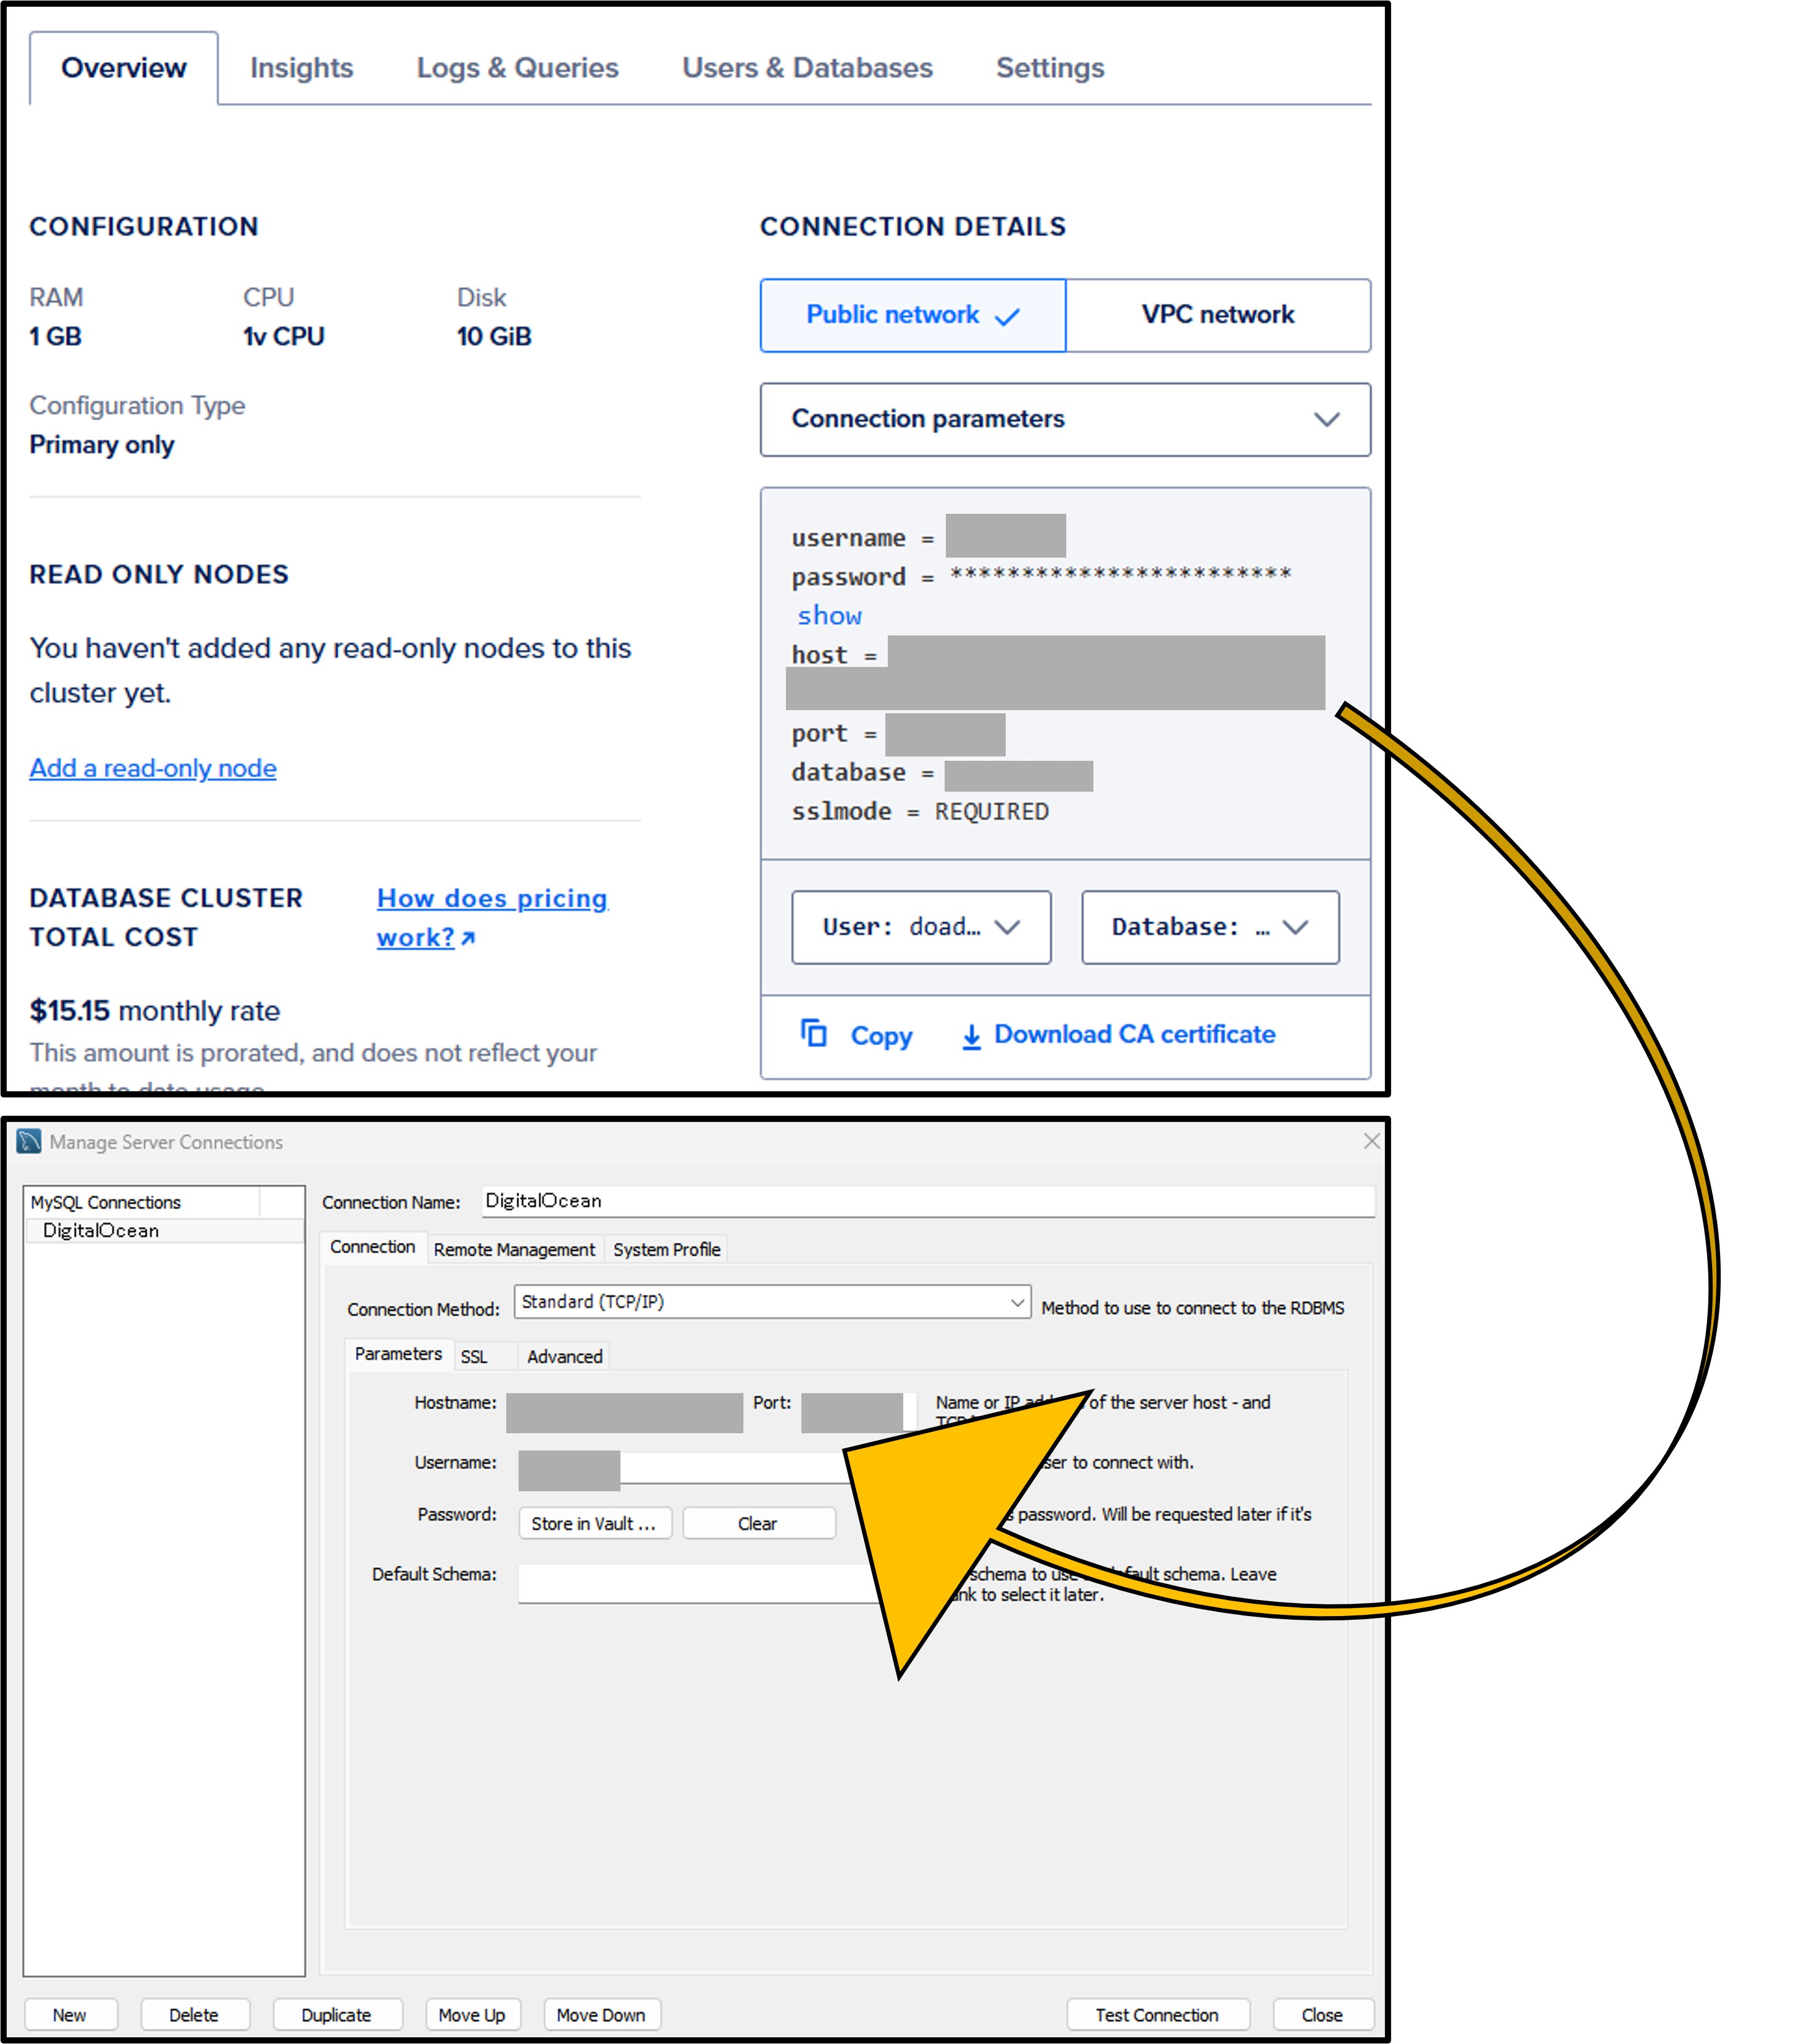
When you set up an SQL database on DigitalOcean, you’ll get the hostname, port, and password. You can use these details to connect your SQL client to the cloud server.

If you want to import data into SQL (herewith, MySQL), you usually have to do it manually in MySQL, which can be a bothersome process. In this post, I’ll show you an easier way to import data into MySQL using commands in the Command Prompt.
1) Install Python library

In Command Prompt, you can install Python libraries. On your PC, search for cmd to open the Command Prompt. Personally, I prefer using PowerShell. Type the code below and press ‘Enter’.
pip install pandas mysql-connector-python
This installation only needs to be done once, but Python must be installed on your PC before running the code.
2) Import Python code to import data to MySQL from Github
The Python code for importing data into MySQL is available on my GitHub. You can use the code below directly.
# python -c "import urllib.request, runpy; exec(urllib.request.urlopen('https://raw.githubusercontent.com/agronomy4future/python_code/main/csv_to_mysql_autoload').read())"
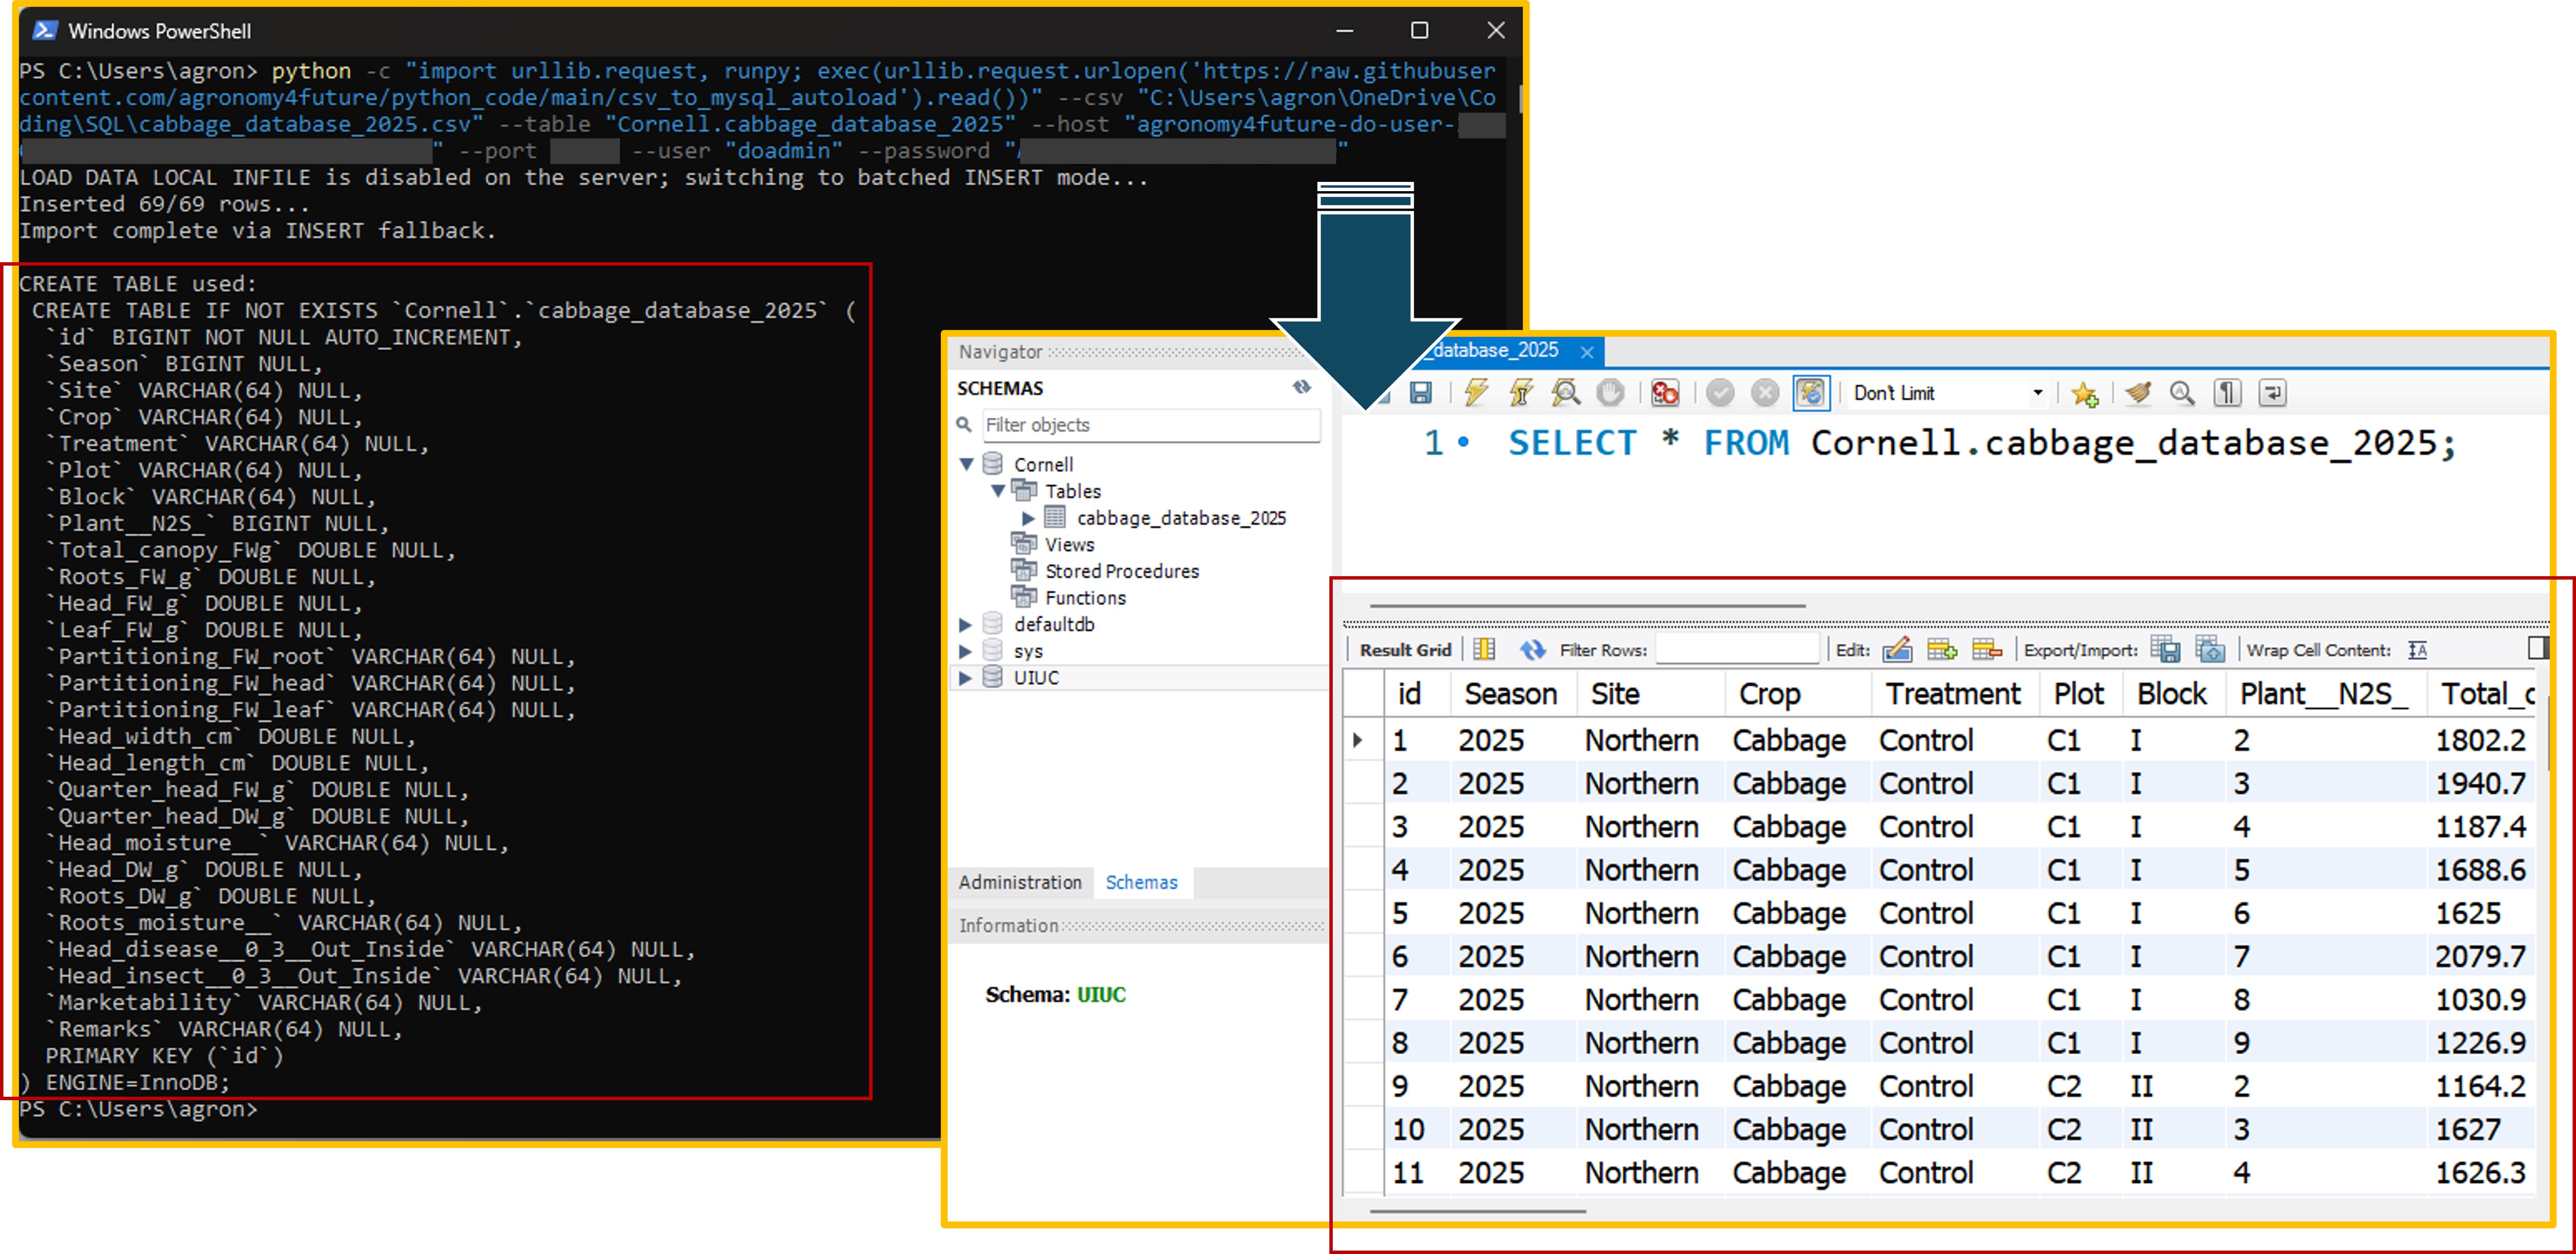
Second, I’ll specify where the .csv data is saved and create the database and table where the data will be imported.
# --csv "C:\Users\agron\OneDrive\Coding\SQL\cabbage_database_2025.csv" --table "Cornell.cabbage_database_2025"
This code specifies that the file cabbage_database_2025.csv located in the folder C:\Users\agron\OneDrive\Coding\SQL will be imported into the cabbage_database_2025 table within the Cornell database.
Finally, I’ll enter my SQL cloud server information.
--host "your host name" --port 25060 --user "doadmin" --password "your password"
The full code is shown below. When you run it, please remove the #.
# python -c "import urllib.request, runpy; exec(urllib.request.urlopen('https://raw.githubusercontent.com/agronomy4future/python_code/main/csv_to_mysql_autoload').read())" --csv "C:\Users\agron\OneDrive\Coding\SQL\cabbage_database_2025.csv" --table "Cornell.cabbage_database_2025" --host "your host name" --port 25060 --user "doadmin" --password "your password"
If the code runs successfully, you’ll see the data column names appear—this means all data has been imported correctly. Let’s now check in MySQL to confirm that the data was imported properly.

If you want to import another dataset named corn_database_2025.csv into the corn_database_2025 table in the UIUC database, you can simply modify the code as shown below.
<mark style="background-color:rgba(0, 0, 0, 0)" class="has-inline-color has-black-color"># python -c "import urllib.request, runpy; exec(urllib.request.urlopen('https://raw.githubusercontent.com/agronomy4future/python_code/main/csv_to_mysql_autoload').read())" --csv "C:\Users\agron\OneDrive\Coding\SQL\</mark><mark style="background-color:rgba(0, 0, 0, 0)" class="has-inline-color has-vivid-red-color">corn_database_2025.csv</mark><mark style="background-color:rgba(0, 0, 0, 0)" class="has-inline-color has-black-color">" --table "</mark><mark style="background-color:rgba(0, 0, 0, 0)" class="has-inline-color has-vivid-red-color">UIUC.corn_database_2025</mark><mark style="background-color:rgba(0, 0, 0, 0)" class="has-inline-color has-black-color">" --host "your host name" --port 25060 --user "doadmin" --password "your password"</mark>
If you're using Linux

You should run the following codes  first.

sudo apt update
sudo apt install python3-pip -y
#
sudo apt install python-is-python3 -y
#
pip install pandas sqlalchemy pymysql mysql-connector-python cryptography --break-system-packages

Also, it should start with  python3 such as  python3 -c "import urllib.request, runpy; ....

Additionally, the file pathway should be Linux format such as /home/kimjk/OneDrive/Coding/SQL/dataname.csv
If you work from home on your PC and the next day go to your office, you can connect to the MySQL server through DigitalOcean and access the SQL data. If you have enormous amounts of data, saving it in SQL is a good way to manage your big data.
We aim to develop open-source code for agronomy ([email protected])
© 2022 – 2025 https://agronomy4future.com – All Rights Reserved.
Last Updated: 05/Oct/2025