In a modern workflow, we constantly bounce between various web-based note-taking tools. For a developer or researcher, the act of opening a browser, logging in, and navigating to a page is a significant context switch. When you are deep in a coding session or analyzing data in the terminal, grabbing the mouse to record a quick thought or a draft email breaks your ‘Flow State.’ Every second spent away from the terminal is a second of lost concentration.
To solve this, I developed a simple Cloud-Synced Command Line Interface (CLI) Worklog for Linux, designed to let you jot down notes without breaking your flow. By following this guide, you can easily install and set up this tool in your own Linux environment.

1. Download Visual Studio

Since I am using an Ubuntu/Debian-based system, I will download the .deb file. Please choose the appropriate package for your specific Linux distribution. Once the file is downloaded, you will need to navigate to that directory to execute it. In my case, I downloaded it to the ~/Downloads folder, so I will run the following command in the terminal:
cd ~/Downloads
First, I’ll verify that the file was successfully downloaded to the Downloads folder by running the ls command.

The code_1.111.0-1772846623_amd64.deb file has been successfully downloaded. Now, I will install the package using the following command:
sudo apt install ./code_1.111.0-1772846623_amd64.deb
2. Install Python in your PC
First, let’s verify that Python is installed on your system. I’ll run python3 --version.

As you can see, Python is already installed on my machine. Next, I’ll run the following commands to install the necessary tools for managing Python libraries and creating a virtual environment.
sudo apt update
sudo apt install python3-pip python3-venv
2.1. Install Python extension for VS Code.
Open Visual Studio Code, and press Ctrl + Shift + X to open the Extensions view. Search for ‘Python’ in the Marketplace and click Install to set up the official Python extension.

3. Set up Virtual Environment
In Linux, using a virtual environment is essential to prevent conflicts between system-wide Python packages and project-specific dependencies. I’ll start by creating a project directory named VSCODE inside the Documents folder. To do this, I’ll run the following commands:
<strong># to navigate to the Documents directory</strong>
cd ~/Documents

<strong># to create VSCODE</strong>
mkdir VSCODE

<strong># to navigate to the VSCODE folder</strong>
cd VSCODE
Next, I’ll run the following command to set up a new virtual environment.
python3 -m venv .venv
and activate.
source .venv/bin/activate

If you see the file path updated in your terminal (as shown in the red box), the setup was successful.
4. Configure the interpreter in VS Code
Now, you need to configure VS Code to use the .venv inside your project folder.
1) Open the Command Palette: Press Ctrl + Shift + P
2) Enter the Command: Search for and select ‘Python: Select Interpreter’.

3) Select the Virtual Environment: From the list, click the entry that includes .venv in its path (e.g., Python 3.12.x ('.venv': venv)).
4. If you don’t see it, click ‘Enter interpreter path…’ and manually navigate to: ~/Documents/VSCODE/.venv/bin/python“

5. Add Python code
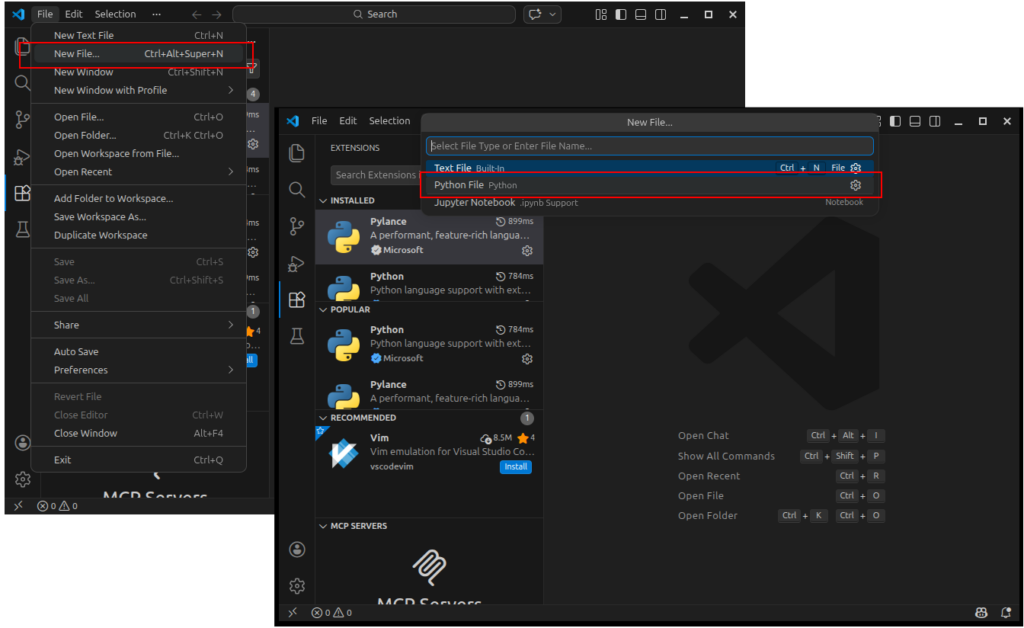
Let’s add Python code to run a command-line interface in Linux and synchronize it with Google Drive. Go to File, select New File..., and choose Python File.
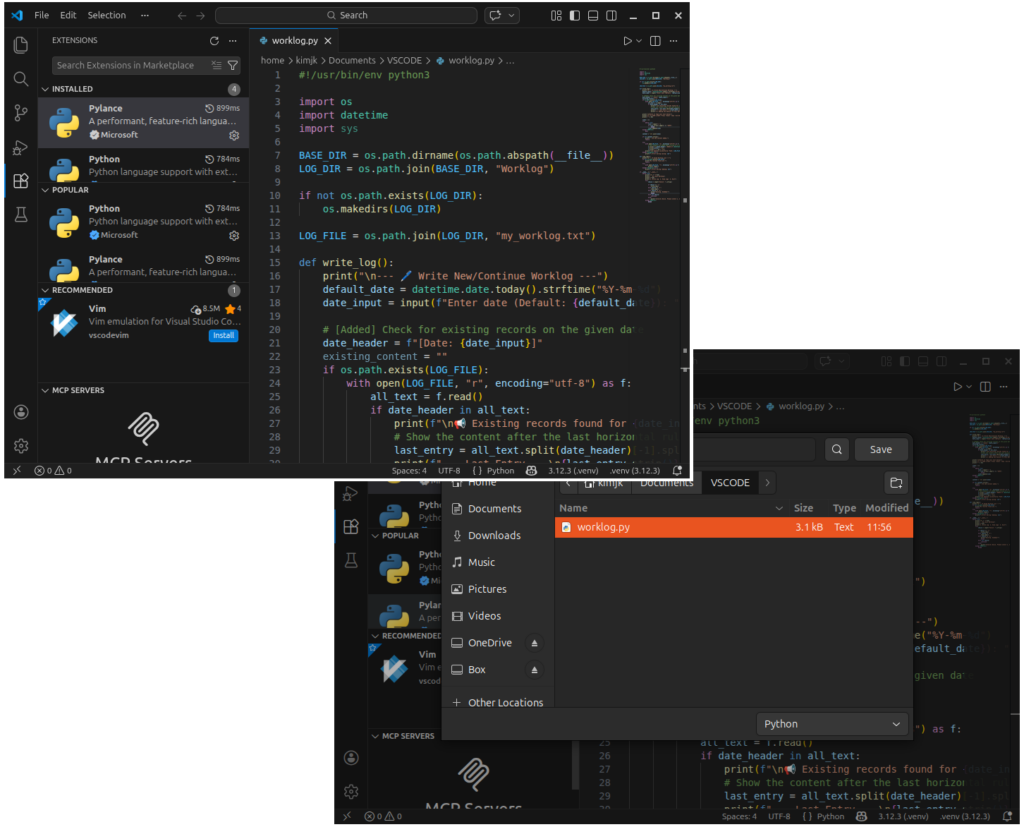
Then, add the Python code from my GitHub and save it in the VS Code folder as worklog.py.
https://github.com/agronomy4future/Python_Cloud_Synced_CLI/blob/main/daylog
6. Grant execution permissions and register aliases in the terminal
We saved worklog.py in VSCODE folder. Now let’s grant execution permission as following code.
chmod +x /home/kimjk/Documents/VSCODE/daylog.py
Next, let’s register aliases in the terminal. I’ll register it as worklog
alias <mark style="background-color:rgba(0, 0, 0, 0)" class="has-inline-color has-vivid-cyan-blue-color">worklog</mark>='/home/kimjk/Documents/VSCODE/.venv/bin/python /home/kimjk/Documents/VSCODE/worklog.py'
Apply changes immediately.
source ~/.bashrc
Sometimes, these aliases do not persist after closing the terminal. To resolve this, please run the following command.
echo "alias worklog='/home/kimjk/Documents/VSCODE/.venv/bin/python /home/kimjk/Documents/VSCODE/worklog.py'" >> ~/.bashrc

# apply changes immediately
source ~/.bashrc
Next, you must set up Google Drive synchronization by running the command `rclone config`. Please refer to the post below for a step-by-step guide on how to sync your cloud drive. While the guide uses OneDrive as an example, the process is identical—simply select **Google Drive** instead.
■ How to Sync OneDrive on Linux using Rclone?
When naming your remote drive during setup, please use the name gdrive, as it is the default name designated in worklog.py. If you are comfortable with coding, you can modify the Python code in worklog.py to use a custom remote name of your choice. For more details, visit: https://github.com/agronomy4future/Python_Cloud_Synced_CLI
7. Run worklog in terminal
Open the terminal (Ctrl + Alt + T) and type worklog (the alias we set up earlier). This will launch the CLI MASTER WORKING SYSTEM; once it loads, type 1.

Next, enter the date using the YY-MM-DD format. For example, type 26-03-09.
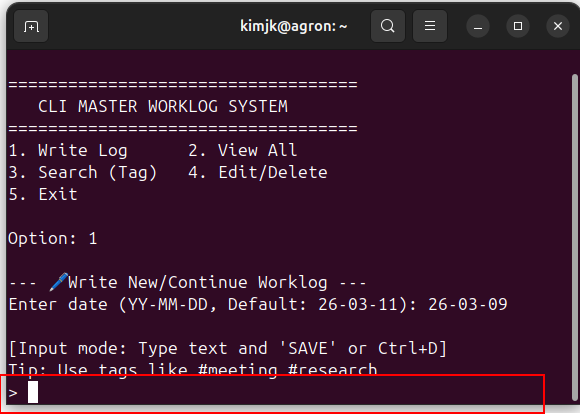
From here, you can enter any text regarding your work.

Once you have finished typing your updates, press Ctrl + D to save.

To add more work logs, type 1 and enter the same date again.

You can view previous entries and add new text, all of which are automatically saved to both your local PC and Google Drive. Logs are stored in monthly files, such as 26-03_worklog.txt. A new file is created at the start of each month; for example, in April, the file will be named 26-04_worklog.txt.

8. Connect with Google NotebookLM
I’d like to introduce a powerful tool for managing your work logs. By syncing your 26-03_worklog.txt with Google NotebookLM, you create a high-level tracking system. Since the file updates automatically from your terminal, you can ask NotebookLM to summarize your progress instantly.

This creates a streamlined process that eliminates manual saving. Whenever you need, simply open the terminal (Ctrl + Alt + T) and type your updates to see the summary immediately. As I mentioned in the introduction, breaking your ‘Flow State’ is costly; every second spent away from the terminal is a second of lost concentration. This tool prevents those interruptions, allowing you to stay focused on the work that matters.
Bonus Tip: Personal Memo System
This tool doubles as a digital diary. Customize the Python source code (https://github.com/agronomy4future/Python_Cloud_Synced_CLI) into a daylog alias to manage your personal memos and daily reflections alongside your worklog.
We aim to develop open-source code for agronomy ([email protected])
© 2022 – 2025 https://agronomy4future.com – All Rights Reserved.
Last Updated: 03/11/2026